Basic Simulator Usage
This is the basic usage for placing and driving our car in the simulator (Sim), and spawning virtual opponents and obstacles to recreate real race situations. The entire perception–decision–control pipeline runs as-is without a real car, so it serves as the first step for validating driving logic.
Terms to know first — this document uses the following terminology.
- Ego vehicle (Ego): the car we drive autonomously.
- Opponent: a virtual competitor car playing the race opponent.
- Static obstacle: an obstacle placed on the track.
- State machine: the brain that decides the car’s behavior (following, overtaking, etc.) based on the driving situation.
Entering the Environment + Launching the Simulation
1
2
unicorn          # enter the conda environment (+ workspace sourcing, cbuild/ros2kill helpers)
ros2 launch stack_master race.launch.xml sim:=true map:=f   # start the simulation
This runs race.launch.xml in simulation mode via the sim:=true argument. map:= is the map name to use (a folder under stack_master/maps/, e.g. f).
Launching with sim:=true automatically enables the feature that injects virtual opponents and static obstacles (virtual_perception), so you can spawn opponents and place obstacles inside the Sim right away without any extra setup.
The Whole Flow at a Glance
After starting the Sim, follow the steps below in order. The details of each step are explained later.
- Run the Sim — launch the RViz window with the command above.
- Place the Ego — put your car on the track with
2D Pose Estimatein the RViz toolbar. - Start autonomous driving — switch to autonomous mode with joypad
RB(or keyboarda). - Place opponents/obstacles — spawn an opponent with
2D Goal Poseand place obstacles withPublish Point. - Observe — watch the Ego avoid and overtake opponents/obstacles in RViz and on the Pitwall STATE banner.
The RViz Layout After Starting the Sim
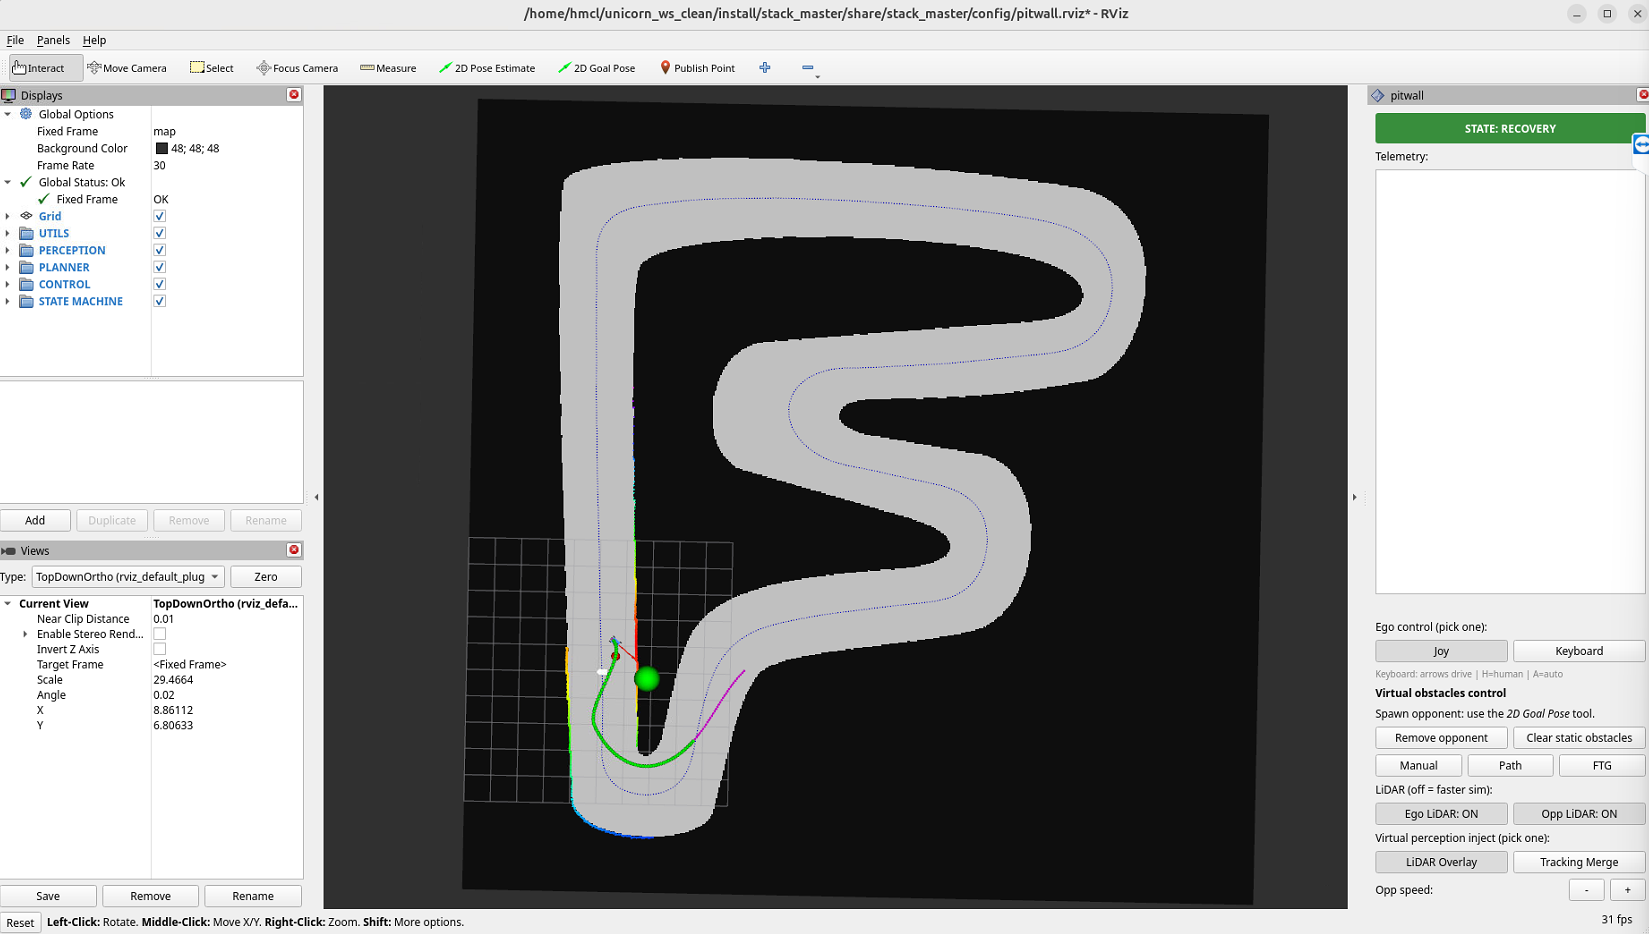
Starting the Sim brings up an RViz window like the one above, divided into three main parts.
- Top toolbar: tools like
2D Pose Estimate,2D Goal Pose, andPublish Point. You click these when placing cars and obstacles below. - Left Displays panel: toggles what RViz shows — map, cars, markers, and so on.
- Right Pitwall panel: the control panel for operating the Sim in real time — driving mode, opponent spawning, speed, and more.
What is Pitwall? Pitwall is a tool that runs and displays various functions simply, including telemetry.
Telemetry means extracting values like the speed and state of a driving car in real time, for monitoring and recording.
Placing and Driving the Ego Vehicle
1. Placing the Ego Vehicle with 2D Pose Estimate
Click 2D Pose Estimate in the RViz toolbar, click where you want the car, and drag in the desired direction of travel — the Ego vehicle is placed facing that way. (Click = position, drag direction = the car’s heading.)
2. Starting the Ego Vehicle
The car stands still at first, but once you switch to autonomous mode it starts driving along the raceline by itself.
There are two ways to switch to autonomous mode, depending on the input device.
- Joy (joypad): switch to autonomous mode with the
RBbutton. - Keyboard:
aswitches to autonomous,hback to manual. In manual mode you steer directly with the arrow keys.
(Whether the input source is the joypad or the keyboard is selected in Ego Control Method.)
Wrap-up
This post covered the basic flow: starting the Sim (race.launch.xml sim:=true), placing the Ego with 2D Pose Estimate, and switching to autonomous mode to drive. The details of each step — spawning opponents, placing static obstacles, and more — are explained in the posts that follow.